Sunday, 17 January 2021

A Quick Post ~ Stuff I've Painted

 Just a quick one to post a couple of figures that I painted over the weekend. Again, it's a bit of a variety which seems to always be the case when doing stuff for skirmish games.

First is this guy: He's from Reaper miniatures and he's great. I was really struck by the pose which conveys a "no nonsense" attitude. He could be used as a ranger character for Rangers of Shadowdeep but I think I'll team him up with another similar Reaper figure to make a Wizard/Apprentice combo for Frostgrave.

Next is a Frosgrave figure. This came in a set with a much better figure. As it turned out this figure has been sitting half finished on my table for several months. I decided to finish it just to get it done. It's not one of my favorite figures. I think it's too busy and looks cluttered and it's feet are awkward and out of scale too. But who knows...? It may grow on me in time. Then, and only then, will our true love blossom.
Skeleton Archers: These are Reaper Bones. I just picked them up a couple of days back and painted them immediately (I picked up the top figure at the same time). They're really simple and I like the look of them. I was inspired to grab them after painting the Mantic skeleton archer I did in my last post. I figure 4 archer-skellies should be enough for most skirmish scenarios.
Some treasure: More from the Mantic Terrain Crate. Nothing really special but the plinth with the crown are actually two separate small pieces that I glued together. They make for an interesting and pretty little treasure token. All of the pieces are based on the plastic bases that I removed from the Terrain Crate figures. 

Friday, 15 January 2021

The Good, The Bad, and The Furniture

Imagine that I'm whistling an Ennio Morricone tune...

What have I got today? A bit of a mix I suppose. I've been painting most of these over the past couple of weeks along with all the other tuff that I've been doing. I haven't posted them because they didn't really fit in with the other stuff. But here they are now:

The Good: Well I assume he's good. He's blue with a greenish burst of magical vapor. But he does have a tiny skull on his belt and his shoulders are a bit pointy (and that points towards evil if I use grim-dark GW logic). Anyway, this figure is from WizKids and it's quite a decent figure. I'm not keen on the "magic effect" on the end of his staff. I was going to nip it off but I decided to leave it. Overall he came out pretty nice.

The Bad: A few baddies here. These guys are definitely evil, because they have very distinct pointy bits (and we all know pointy means evil. Besides... I painted them evil red too!).

All of these figures are from the Mantic Terrain Crate. After a closer look the figures vary in quality. Some are really good and some a pretty bad. I like this first one. He's pretty basic but he looks good. My only issue is that it's a touch too small and it would be better if it was a just couple of mm larger.
This is a three headed Hound of Heck! When I first saw this figure I though it looked really good. After painting it I think it looks a bit cartoonish. It's okay but it could be a bit more menacing. Maybe it's my paint job. But it's okay and I can see me using it for some evil purpose sometime in the future.
A couple of skeletons and a ghost. The skelly with the scythe is pretty crappy and looks like it came out of a packet of Corn Flakes. The archer skeleton is much better and, unfortunately, there was only one of him in the box. The ghost looks much better in the flesh than my photo gives it credit. It has a really nice twisted forward pose. It's a really nice little figure.
The Furniture: These are all pieces from the Mantic Terrain Crate. This box has some really nice pieces that can be used for many different scenarios and settings. Many of them are small and simple but they have the potential to make a dull scene look a bit more interesting. The astrolabe is a particularly nice little model and is my favorite piece so far. The base for the mirror is one of the original figure bases. I decided to put the figures onto round bases and I've used the original bases for some of the terrain pieces.
Another set of dungeon doors. I'll call these ones Robbie and John.


Tuesday, 12 January 2021

A Fist Full of El'Cheapo Budget Vapor Snakes

I'm still looking at solo Frostgrave and I've been looking at the various scenarios and mini campaigns. I found that I'm going to need Vapor Snakes. 

Questions: What are vapor snakes? Where do I get 'em? How much will they cost? How many will I need? What else can I use?

Answers: 1) I don't know. 2) From an online store. 3) Not cheap. 4) Quite a few - which will make them expensive. 5) Hmmm... I have an idea...

Yes, I decided to make my own Vapor Snakes. I figured I could make them very cheap and very easy and very quickly.

I took some pipe cleaners (it amazes me that they still make pipe cleaners despite there being very few people who still smoke a pipe).
For the vapor snakes, I needed normal size ones and large ones. For the normal size I cut a pipe cleaner in half and folded it. I then twisted it into one piece. For the large ones I folded one pipe cleaner three times and then twisted it into a single piece.
I then glued one end onto an mdf base (25mm base for the regular and 30mm for the large).
When the glue was set I bent them into shape (this one, by the way is one of the large ones).
I then gave them a solid coating of impasto meduim. Basing texture gunk or tacky pvc/wood glue might also work.
When dry I gave them a good coat of Vallejo pale blue grey (but any pale grey should work). 
When dry again, I gave them a heavy dry brushing of white.
Here they are. I did 6 regular size and 3 large (only 2 in the pic). When I painted the bases I gave each base a dry brush of white to make them look a little bit vaporish.
They're certainly not the best looking figures that you could use but they give the effect of writhing columns of sentient vapour. For the cost of 6 pipe cleaners and a handful of bases these little guys came out all right. Most of the time spent was waiting for the impasto medium to cure. But when it was fully cured it gave them a fair bit of solidity with flexibility so that they can be re-pose if needs be.


Monday, 11 January 2021

Cork Pillars ~ Quick Fantasy Terrain

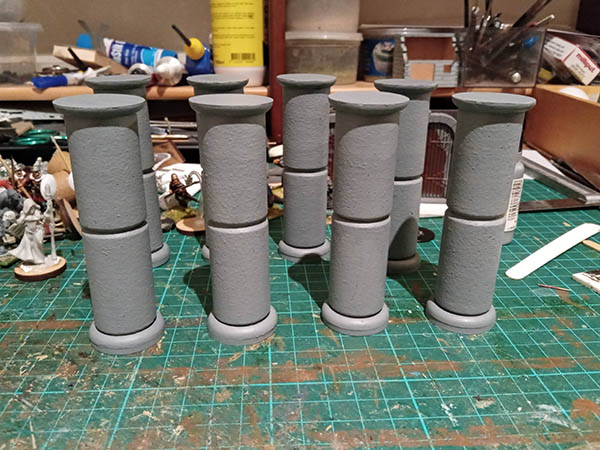
I wanted some pillars. In fact, I've wanted some pillars for quite a while. I had a pretty good idea of how to make them but I just never got around to doing it. But a couple of days ago I made them. They are cheap and easy and super quick to make. Here they are:

To make these the main ingredient is wine corks. I bought a bag of these years ago to use for sculpting. You can get them from most home-brew suppliers. The other ingredients are: 30mm round lipped bases and 30mm mdf bases. These piece are not compulsory and other similar items could be used.
Glue a pair of corks together.
Take some bases.
Glue them on to the ends of the corks. Glue the mdf base on to the bottom/base
Undercoat them. (This is Egbert, the 28mm Saxon for scale reference)
Paint them grey (or whatever colour you want) and dry-brush them.
They are finished. They're lightweight, sturdy and stable. I might magnetize the top of them so that I can add some sort of walkway on top.

As I was making these I thought to myself: "Hmmm... These would make really good pedestals to hold figures while I'm painting them". One cork + an mdf base. Hot glue or Blutack the figure onto the mdf base.... Start painting. Easy!

Sunday, 10 January 2021

Frostgrave Terrain & Treasure Tokens

Going back to my post of a few days back you'll see that I refurbished a terrain board to make it usable for Frostgrave. When I finished doing that I decided to make a bit more terrain for the same game. This terrain is pretty basic and it's just foam wall sections glued together with no real rhyme or reason. It's table filler terrain, really.

I did try to get some sort of elevation for some of the pieces to represent a basic effect of multi levels and encourage climbing (and falling). I didn't add any snow/frost effects. I did that for the first few pieces I made and didn't bother on the next batch. Likewise I didn't add snow effects to this new stuff. The reason for that being that snow effects  really limits the possible uses for the terrain. Un-frosted the terrain can be used for any ruined city and, if I really want to I can just sprinkle baking soda to create temporary snow.

These are the new pieces. As I've done previously these are pretty cheap and easy. The main material is high density insulation foam scored and shaped using a hot wire cutter. The bases are scrap cardboard edged with masking tape. Each piece has three coats of grey caulk. The first coat is thinned with water to get into all the nooks and crannies. The second coat is watered but thicker. The third coat is for adding texture and to pick up any areas where the previous coats missed. When cured they were dry-brushed with off white emulsion paint.
The pieces come out pretty strong and sturdy due to the caulk even if they are quite basic.

I've also been delving into the Mantic Terrain Crate that I bought. I just added a few pieces to the current batch of things that I'm working on. There's nothing really interesting about any of them but they look pretty good for what they are. 
I also put together some treasure/loot tokens. These are mostly made up using bits from a WizKids set of wizard stuff (a pack full of bottles, books and whatnot). They look more interesting than bland 2D tokens. I do have other treasure tokens and these will go nicely with them.
That's all for now.


Saturday, 9 January 2021

Is Beauty in the Eye of the Beholder?

I'm back to painting monsters, other critters and game pieces at the moment. This is because I've shifted my focus from big unit games to skirmish again. As usual, I'll keep on this track for a while and make a bunch of stuff until I get distracted by something else. Then I'll blitz that new thing (whatever it may be).

First of all is this little beauty:

A Beholder! At least that's what they were called when I last played D&D (early '90's). This fine chap is from WizKids and he's called a "Spectator" (?) or something similar. I threw out the packaging and I can't remember what it said. My mind is a bit vague on the subject but I do remember the name Beholder.

I was a bit intimidated with the thought of painting the eyeballs. I did them by doing lots of layers:

Grey undercoat. Red wash. Grey/white. White (x2), Very thin burnt orange (x2). Fiery orange. Fiery orange + yellow (50/50). Bright yellow. Then I added the pupil using flat black followed by a white dot. Then I did a coat of flat varnish followed by two coats of GW 'Ard Coat. So... All up 15 layers. On each eye.

He came out looking pretty nice. I like the clear plastic stand. It attaches to his back as you can see in the pic below.
And a troll. In particular: This bloody big troll.
This is yet another figure from WizKids. I decided to make it into an Ice Troll for Frostgrave. It's really large and here's a pic with an Oathmark  dwarf to give you an idea of scale.
From big to small. This one is a Fire Sprite or whatever. It's another Reaper Bones figure and comes from the Familiars set. This is one of the figures from this set that is usable.  A couple of the figures are no good and I threw them out because I couldn't make out what they were supposed to be. It's only a tiny figure and I don't know what I can use it for.
These dogs came with the FireForge skeleton cavalry. They were supposed to be "undead" and I needed to patch up the holes in them (holes that were supposed to look like decayed flesh!!!). They looked pretty crappy but I patched them up with greenstuff and they came out looking okay. There's two of them - One from each sprue.
And I think that's it.