After a couple of weeks rest from Napoleonic's we had another game last night at the club. I had a few more Prussians to put on the table this time around so my opponent Mike Goldyn added some Polish cavalry to forces. This time around we set up a simple table and set up on opposite edges and advanced towards each other.
I watched an episode of Battlground (the old Edward Woodwood TV show about wargaming) and noted that during each move the players would state what they were doing. So we tried doing this and it seemed to work pretty well. It seems that communication is an important factor when it comes to simultaneous movement. Because you're not reacting to enemy movement in "your move", stating your intentions clearly and carrying them out as stated make matters easier. If something happens that causes you to react differently that you stated there is the rule of taking 1/4 of a move to assess the changed situation and reacting accordingly.
Besides all that, we're going back to old school gaming and it seems the gentlemanly thing to do. So why not do it that way.
Anyway, the game started simply with both sides advancing. I pushed out my skirmishers on both flanks. I had my (new) gun battery deployed from the first move and they started a barrage from turn 1, inflicting some casualties on the Polish center.
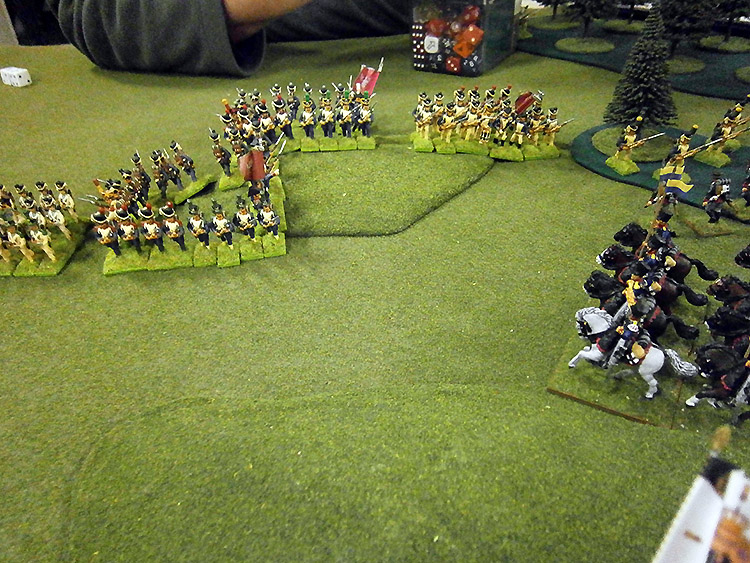
We continued to advance with a Polish cavalry regiment making its presence know coming from the flank around some woodson the right. My fusilier battalion turned to face them and formed into a closed column. This formation, which isn't included in the rules, became a topic of confusion in later turns. My Fusilier company skirmishing out front made a dash for the protection of the nearby woods and became separated from their parent unit.
In the center, my guns continued their barrage and inflicted more casualties on the center Polish battalion. On the right a Prussian musketeer battalion formed line on the top of a hill and my two squadrons of uhlans advanced.
Turn three and both the Polish and Prussian cavalry charged. Prussian shooting caused a casualty on the Poles but it wasn't enough to stop them from charging home. On the right the Polish infantry formed square and brought fire to bear on the uhlans from the front and flank causing a single casualty. The flank fire, although not effective was enough of a factor to prevent their charging home and they retired in good order. But the Polish square took some casualties from the Prussian guns.
On the flanks skirmishers from both sides fired on each other with some minor casualties caused but without any decisive outcomes.
Turn 4 - Because the Polish charge took the entire period of turn 4 to hit home the resulting combat didn't take place until turn 3. We didn't know what to do with the closed column so we decided on reduced factors as per a square. This seemed to work for the first round of combat where the Polish cavalry forced the Prussian closed column back. A morale test had the Prussians holding firm which triggered a morale test for the Poles who also passed the option to charge again.
The Skirmishing continued on the flanks with the same results as before. The guns gain opened up on the Polish center battalion who were now looking a bit battered. The uhlans retired voluntarily in good order.
Turn 5 - The Polish continued to advance in the canter but the poor center battalion were now in canister range and took a pounding but a morale test had them Halt where they were (not a good thing for the next turn - Had it happened!). Although by this time after 5 consecutive turns of firing the Prussian guns needed to rest.
So what happened?
The Polish cavalry pushed on into the Prussian column and this time hit them hard (5 casualties). This is where we got a bit unstuck. The closed column seemed to be completely ineffective. They may as well have been in a column of divisions.
We talked it over and called in some other fine fellows (Messers Jenkins and Gerhrad) for their opinions. We came to the conclusion that the closed column should be treated as a square if attacked from the front or rear but as a column if attacked from the flank. We also talked pros and cons of square v's closed column.
When you look at it Square provides the best formation v's cavalry. However it's static but also enables shooting from all sides. The closed column should be solid from the front or rear but only enables shooting from the front. On the plus side it's mobile.
We decided that squares don't get pushed back following a combat but they will suffer from being unformed like all other formations. Any resulting morale tests will normally see average troops holding firm but there is the likelihood that poor troops (Spanish/Neapolitan, etc...) could break and run. A closed column, because it's a mobile formation would be pushed back the 50mm for losing a combat as stated in the rules. It would also become unformed. But, like the square you could expect half decent troops to hold firm from resulting morale tests.
Likewise most cavalry, if they a forced to retire, could easily reform for a second try.
And something else to consider: The rules don't take into account cavalry being
blown. There is no mention of this anywhere in the rules!
Another problem that arose from this melee was: If the cavalry's morale test results in "Charge" do they charge in the follow up round or are they just continuing to press the attack? We didn't solve this question because it got lost in all the talk of squares and closed columns.
Overall, it was another good game. We keep getting bogged down with situations that we can't easily solve but this is okay. The idea of all these small games (apart from the fact that my forces are still quite small) is to hammer the rules into good working order. The other basic aspects- movement, shooting, formation changes, etc... has become faster and we can pretty much calculate things without referring to the charts. Some of this is down to making movement and formation changes into general concepts and removing them from the National Characteristics quagmire.