
Their opponents were from a growing city state called Rome led by Rufus Gorringicus. How dare these Latin upstarts challenge the might of the successors of Alexander. They need to be taught a lesson in humility!
My fleet has 30 ships consists of: my flagship an Octares ~ (8), 2 Heptares (7's), 12 Quadriremes (4's) and 15 triremes (3's). The Roman fleet facing them was smaller with 25 craft with a Decares (10) as the flagship, 3 Sextares (6's) and 21 Quinqueremes (5's)
So my fleet was larger; but lighter and faster. The Romans; smaller but tougher. Mine had the Maneuver ability and the Romans had the Boarding ability.
The only terrain: A small island to my right.

In the center, my flagship ~The Triton.


And facing them, the upstarts. Waiting for a sound thrashing.


My cunning plan was this: To deploy with the island on my right with a squadron refused. The idea was to drift gradually to the left and allow room for the refused sqn to join the front line. This would allow me to create an overlap on the Roman flank. I also deployed a squadron of triremes on the other side of the island to try and lure one of the tougher Roman squadrons away from the fight before turning tail and using my greater speed to rejoin the center.

The first moves were quite simply moving forward. But, in my enthusiasm, I forgot that little part of my plan about drifting over to the left.


So we continued to move closer and I did remember to drift left but I underestimated the distance and didn't leave enough room for the refused squadron to fully deploy. As we closed the Romans got the jump on me and unleashed a barrage from their siege engines hurting me quite badly. My smaller triremes were not up to the Roman ships' ability to deal out damage.

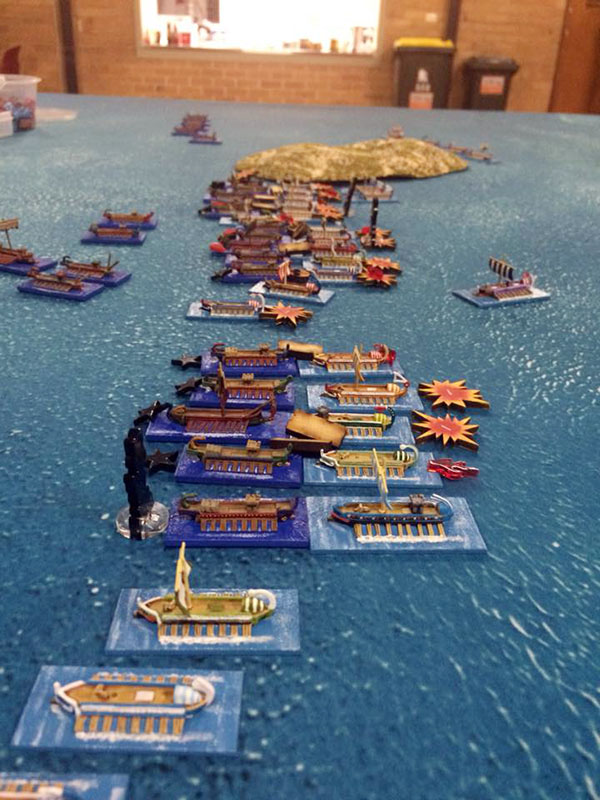
My only option was to ram. But with that came the risk of being locked by the Roman corvii and boarded. And, those little planks you see below represent corvii.
The explosion tokens represent hull damage and as, you can see, my ships are sporting quite a few. That said, my opponent was using less dramatic black stars and there are quite a few of them on the table.

My ramming attack wasn't as bad for me as it looks. I wreaked the Roman ship on the right end of the line and captured the ship on the far end of the left. So far all of my craft were intact.

I even managed to create a gap in the Roman line and pushed a couple of ships forward. On my left I did manage to create that overlap and got a whole squadron of quadriremes around the flank.

Now, my rightmost squadron had lured the Romans away from the battle and I now turned to back into the center.


As the sun sets in the club canteen, the battle begins it's final phase...


In the next turn, I decided in a couple of places to take the fight to the Romans and paid dearly for my mistake. I managed to get some of my ships behind the Latin upstarts and inflicted some damage but not enough. One of my triremes was rammed by the Roman decares and was wreaked & smashed into flinders with ease.
The Triton, although slow, did get into the action and used its engines to damage a pair of Roman quinc's. But as the pic below shows almost my whole center was either captured or wreaked. I did manage to pull a couple of my ships out of the fight and I still had about 2/3 of my fleet intact. But I had lost one of my 7's and it would have taken several turns to recall the squadron roaming in the Roman rear. So, there was nothing left to do other than retire and surrender the waters to the new kids on the seven seas.

Conclusion:
We tried a few modifications to the rules: Ad Mere Bellum. Because of the size of the fleets we weren't happy with moving the entirety of one fleet and then the entire opposite fleet. The rules also allow for one side to have multiple turns in a row depending on activation cards drawn. So we opted for 1 card for each squadron with each card drawn allowing a squadron to be activated.
I'm not sure if this worked as well as we'd hoped. At first it was okay but it became confusing when the fleets locked together. Next time we're going to allow multiple activations with each squadron. That way it will negate the need to remember which squadrons have activated and which have not. It will also allow a player to ram and have the hope of withdrawing before getting locked into a boarding action. At the same time it will allow a boarder to really press the attack with a possible follow-up activation if they're gaining the upper hand.
The other thing we need to do is work on the tokens. Whilst I quite like the chaotic look it is difficult to lay them in place and keep track of them. Something a bit tidier but (unfortunately) less dramatic is needed.
We also need some "wreaked ship" tokens.
And here's a few extra pics taken by Russel and posted on the NWA Facbook page. He has a better eye for a photo than me.


Great stuff - love the pictures
ReplyDeleteThanks David, and thanks for the rules too. As mentioned above, we're trying out a few tweaks to suit our ideas but sticking pretty much to you original concepts.
DeleteGreat battle report, good paint jobs on the ships and excellent pictures. Romans abandoned the Corvus after the first Punic war as it made ships top heavy and unseaworthy.
ReplyDelete