Thursday 31 October 2019

Basic Desert Buildings

I made these for my 20mm WWII games. I've posted the finished product on my other blog but I thought I'd post the construction of them on here.

They're made from 5mm cork sheet that I picked up at a model railway shop (although I did have a few scraps laying around from older projects. For these type of buildings cork has a nice texture.
I like this material because it's easy to work with. It's easy to cut and you can use just about any sort of glue with it. I used tacky PVA. You can sand it down to take away any rough edges and you can chip away little pieces to show the rough brickwork beneath. I did that with some walls that I made a while back (I'd add some pics but I can't find any).
As you can see the building is pretty basic. I used some off cuts to make the door frame and some of the windows have a bit of a pain. The wooden roof support things are just pieces of toothpicks that I cut in half and pushed into the cork. All very easy.
Oh yeah... The Roof! This is a piece of foam core. When it was all constructed I gave it a coat of PVA and sprinkled a touch of sand to give it some texture.
Thin pieces of cork are pretty flexible if they have little bit of length to them. You can see where I made the arched door frame using this flexiness. I just did it one piece at a time. I glued and pinned the fist piece and when it was cured firmly in place I added the second piece and pined it. I came out okay as far as I'm concerned.
 All painted with some cheap white acrylic with a very faint wash of sandiness on the roofs and floors.
P.S. The blue on the inside is from the blue marker that I used to mark out the windows and doors. 
I won't use that pen again.

Monday 21 October 2019

Quiet but Still Busy


My apologies for those who read this blog. It seems like I've gone a bit quiet of late but that's only because I'm posting a lot more on my 20mm World at War blog.

If you are interested there's a lot of stuff posted there that I haven't posted here. I'm not sure how to cross-post so I'm sort of stuck just updating one blog and leaving the other behind. It's all WWII, so if you're interested in this era you might find things that interest you. If not... You'll probably have zero interest on what I've been doing.

Anyway here's some pics of recent posts, in case I can entice you to have a peek.


Tuesday 15 October 2019

Pretty Little Flower Beds

Not much report here (more over at This 20mm World at War) but here's a little bit of terrain I made during the past couple of days. Some little flower beds.

These are just some mdf bases that I chambered the edges on. I added some gule and sand. gave it a bit of paint and then stuck on some of these little grassy tufts with stones and flowers (I bought them from Eureka on my last visit). The came up pretty nice.

The shed is a HO scale railway terrain kit. It looks the part, although I think it was supposed to be some sort of railway control building. Whatever... It looks like a shed to me.

And flower beds really do brighten up a brewed up tank.

My Paint Pallet

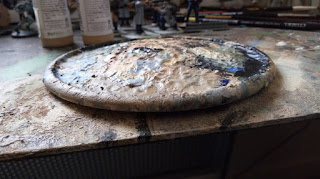
For a pallet I use a 120mm base. One of those sort of hollow bases with a lip that you're supposed to fill with basing materials (or you can put water effects in them). I've been using this thing for years and it was getting a bit full - Full to the point that it wasn't flat any more. More like a 120mm base with a hill inside it.


Anyway, last night I decided to clean it. This is the second time I've done this. The last time was about 5 or 6 years ago. So I cut out the obstruction.

This Hill of Paint is about 15mm thick and considering that many of the layers of paint are about the thickness of dried water that amounts up a lot of layers over the years. My guess is the colours visible in the photo below are thicker layers from when I applied the same colour in the same spot during single painting sessions. 
It's somewhat psychedelic, don't you think?


Saturday 5 October 2019

Yet Another Terrain Mat

Greetings reader,
I was on facebook yesterday and saw a nice looking grassy terrain mat and got into a bit of a conversation about it. I then decided to try my hand at making one. I had all the bits and pieces that I needed so I got started.

I used a 2 meter fleece blanket that I picked up from Target for $15. I set up a table in my garage and laid out the blanket and started painting it with various acrylics that I had in the garage. I started with patches of dark green and dark brown. I followed that with an overall covering of medium green and topped that with a lighter green and ocher. I then put on a top coat of a pale yellow (called "Mango" on the tub) to blend it all together.

It took a few hours to do. Each layer/coat took about an hour or so followed by drying time. I then left it hanging overnight to dry completely.
I think it came out okay. I used it today in a game and it looked pretty nice although I am considering giving it a bath in a tub of tea to dye the basic fabric. If I do that it will probably need a final layer of yellow to bring the vibrancy back. I'll see what happens.

All up it cost about $25 - It took up a fair amount of paint but I got several large bottles cheap at an art shop sale (50% off). Some of the paint I already had sitting on the shelf in the garage.

It may not be as good as a pro-gaming mat but to buy a decent mat in Australia will set you back about $120.00. So $25 and a bit of work is a good saving.