Wednesday, 27 November 2019

Waiting for Sabot

Almost immediately after deciding that there was a re-basing that needed a-dooin', it was also determined that I'd need sabot bases to hold the figures in formation. As mentioned in my previous post I asked Mike at Battlefield Accessories if he could make them for me.

So I made a design using photoshop and in record time Mike made them (the design wasn't exactly anything groundbreaking). That was Sunday and they arrived on my doorstep a on Wednesday (yesterday).

I had the time to put them together, so I put on an audio book and got to work. Not long after I had 28 lovely bases. I also got to work removing figures from bases and putting them onto the 20 x 20 bases that also came with the sabots. I did quite a lot of them.
Adding flock came next. I got about half of them done but not all because I was also flocking the new figures bases. They look nice but I think I'm going to need more if I intend to use them for larger Napoleonic games other than Sharp Practice. We'll see when I have everything done.
Okay... I was taking some photo's and I came across a problem.

When I was doing the sabot bases I thought I'd make some 4 figure sabot "command" bases. I'd only need a few of these. A couple for the Prussians and a couple for the French. My plan was that I would be able to place the command base in between two wings of troops and form a battalion. Easy!

I'd also get some 30mm round sabots made that I could fit the 20mm commanders' bases into for Sharp Practice. I even made up a couple of solid command bases (with figures glued direct onto the bases) because I'd only need a few single "leader" figures for SP.

A battalion with 4 figure sabot command base.
 A battalion with a 4 figure regular command base.
I took those pics and then I realised something: I can't deploy them into an attack column! Not only that, but there's no room for the voltigeur company (for the French). With the Prussians I'd end up with extra figures with nowhere to go.

I actually need to model all of the figures onto 20mm bases and use three full sabots for the battalion. Both my Prussians and French have 24 figure battalions so so I actually need to base them like this:
So that I can deploy them into an attack column (left) instead of the shonky looking column on the right. 
At least I didn't get too far and I only ruined one of the sabots with my dud experiment.

Sunday, 24 November 2019

So Begineth the Great Re-Basing

I've been getting dragged further into the world of Lard and as such I have been lured towards the delights of Sharp Practice. This may seem a forgone conclusion to many who play SP2 but it's a bit of a jump for me.

I'm a fan of Napleonic's which I started as a school boy back in the very late 70's but I don't get to play many games these days. Part of this is due to my preferred rules and scale. At my club FOGN in 15mm is popular as is a homespun set of rules called Cold Steel. FOGN - I'm not the least bit interested in. Cold Steel, I played for may years but it lost me somewhere a while back. I don't really know why and I've dipped my toe into CS every now and then but it doesn't really do it for me anymore. I think it's because I learned how to make it really gamey and I don't really like that.

So, a few years back, I went "old school" with Bruce Quarrie's - Napoleon's Campaigns in Miniature. It got me back to painting new troops but the rules are difficult in these modern days. So things came to a halt.

Then I tried General d'Armee and I really like them. I got a few others involved and we played half a dozen games. But that was it. I was happy to keep going but I could see that I was going to have to paint up, at least, twice the troops I already had and I wasn't up to that challenge.

So my French and Prussians have been sitting in boxes for the best part 18 months and I can't seem to interest others in more games of GdA.

Now that I said all that; Why Sharp Practice?

Well I became a fan of Chain of Command a few months back after watching several Too Fat Lardie's videos. I watched, I played and I like it. Recently I watched some Sharp Practice videos and I like the look of the game. I wasn't keen when first given the chance to play them a few years back because they didn't seem to be on  a large enough scale for my liking. But having seen games played I've changed my outlook.

There are also several other members at my club that play Sharp Practice & they have different forces than I have. So this can only be a good thing. Variety is, after all, the spice of life and as we know: The Spice Must Flow! And here we are!

I was unsure how to go about using my troops. After asking around for advice, looking at what I have already and going against most of the advice I received: I decided to re-base my French and Prussians (along similar line to other club members).

"EGAD!" I hear you cry. "What is the fool doing?"

Well, I look at it this way: I'd rather re-base and get to play good games with good people rather than leave what I have in boxes and paint more of what I already have. The difference being about 6 to 12 months of brush-work v's a week and a half of pain. I'll go for the week and a half.

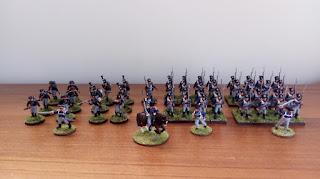
So, now that all of that is said here's what I have so far. What I have will work okay for 1812 to 1815.
The two opposing little forces below will work for 1813/14 for a couple of solo games to work through the rules.

I also have at least thrice the amount of figures still in their barracks-boxes awaiting a shipment of 20mm square bases!

 French:
Level III leader - 2 x Regular Fusiliers
Level II leader - 1 x Grenadiers
Level I leader - 2 x Marie-Louise's 
Level I leader - 1 x Voltigeurs
(I need to base a voltigeur sergeant)
The French don't have any sergeants to help out the junior officers - This represents experienced NCO losses in the Russian campaign. (And because I don't actually have many French NCO's).

Prussians:
 Level III leader - 2 x Regular Fusiliers
Level II leader - 2 x Regular Fusiliers
2x Level I leaders (Fusilier Sergeants) 
Level I leader - 1 x Volunteer Schutzen (V&C) & 1x Guard Schutzen (Skirmishers)
I have some sabot bases on the way. They've been made for me by Mike Parker at Battlefield Accessories. I've had more that I need made up but I have a cunning plan...

My plan is this: I'm going to base one standard, one drummer, and other tête de colonne figures on round bases for use in the game. Others I'll mount on large square bases to match the sabots to make command bases... In this way I can use the command base - Stick two sabot's on either side and I have a battalion for GdA.

Tuesday, 5 November 2019

Oooh Vicar!

I made a new church.

I looked long and hard for a nice 20mm model but I was put off by the price in most cases. It looked like I was going to have to pay $50 to $70AUD for a decent 20mm church. And add postage to that.

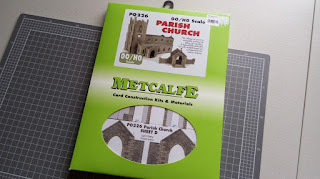
But I found a card model in a local railway shop. Still at a considerable price but not quite so hard on the wallet. So, I thought about it for a week or so and then decided to go for it. And I'm glad I did.

This is a fantastic model. It's fully detailed and textured. It's strong and hefty and very solid. I'm sure it will be able to take the regular beating that most wargaming terrain seems to take. The detail is fantastic, especially the windows in which some of them are 4 card-layers thick!

There were a lot of pieces and emptying the packet was quite daunting. But I just followed the instructions and they were pretty clear and easy. The parts are 95% pre-cut. I say that because each part has a tiny area that it still attached to the card and needs cutting. But all very easy.
I left the tower separate so that I can easily put troops into the lower floor. It lits out and fits back in very easily and very snug. I also added an inner floor to to place troops at the upper windows.

The lych gate is separate and I'll incorporate that into a terrain base. You can see the entrance hall on the side. This piece can go on either side and I haven't yet decided where to put it so at the moment it's still lose.


The roofs come off so that troops can be placed inside. The bottom of the rear is quite deep but still accessible.

I couldn't make the roofs of the wings removable, but they don't really need to be. Just place figures above the windows to show which windows they're hiding behind.

The top of the tower was a problem. I needed to trim the lid to make it easy to remove and replace. Nothing drastic but it needed work. The bell tower itself is very deep and in play it would be impossible to place and remove figures. So I made a little platform that fits in securely. It's just a piece of card glued onto lump of balsa wood.

 A sniper can now be easily placed and removed from the bell tower.

This photo gives a good look at the detail on the windows. I did watch a you tube tutorial and saw one guy paint the clear window film with glass paint to create a stained glass look. Very impressive but hey! I'm making wargames' terrain. Not a model railway.
So, all up this took me two days to finish. I could have done it quicker but I was doing a bit at a time in between household chores. If you're considering something like this I can absolutely recommend this one. I now have to make a decent churchyard.

So there you have it. I build a church.

Next thing I need to do is raise a barn!